


Redis Cache is a high-performance, in-memory data store used to temporarily save(cache) data so your application can access it faster than from your database.
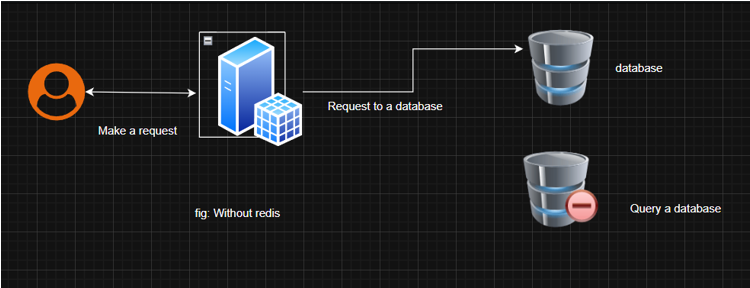
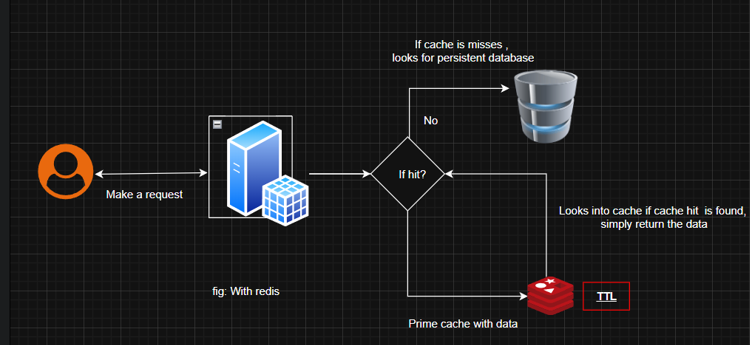
In the above diagram, you can see that when we do not use Redis, every request hits your database, which causes unnecessary loads on your server. On the other hand it the diagram where we use Redis, first we check whether the required data exists in Redis, we fetch from the database, then keep that data in Redis cache, and then only respond to the user. So that when the user makes 2nd reques for the same data, we can take the privilege of Redis to respond to the user query from in-memory, without any database query.
When To Use Redis Cache:
- Read-Heavy, write-light data: Cache data that is accessed(read) often but rarely updated, such as user profiles or posts (for blog applications).
- i..e.
- User Profiles, as they are viewed frequently but rarely updated.
- Search Results: Cache results for posts or user searches to improve response times, but use a short expiration time due to dynamic search criteria.
- Expensive Queries: Cache results of complex or time-consuming database queries, like search results.
- Static or semi-static data: Cache data that doesn’t change frequently, like company information or job categories
When Not to Use Redis Cache
Avoid caching highly dynamic data, such as real-time notification or frequently updated application status, also avoid caching rarely accessed data, as it wastes memory.
Where to Use Redis Cache in CRUD Operations
- Read (R): Cache data during read operations to speed up retrieval. For example, cache user profiles or job listings when fetched from the database.
- Create (C): After creating a new record (e.g., a new job listing), update the cache to include the new data.
- Update (U): When updating a record (e.g., a job description), invalidate or update the cache to reflect the changes.
- Delete (D): When deleting a record, remove it from the cache to prevent serving outdated data.
Cache Invalidation Periods
The cache invalidation period, or Time-to-Live (TTL), determines how long data stays in the cache before it expires. For a job platform:
- User Profiles: Set a TTL of about 1 hour, as profiles are relatively static.
- Job Listings: Use a TTL of around 15 minutes, as jobs may be updated or filled quickly.
- Search Results: Set a short TTL of 5 minutes, as search criteria can change frequently.
- Application Statuses: Use a TTL of 10 minutes for dashboards showing application statuses, as these may change during review processes.
When data is updated (e.g., a user edits their profile or a job is filled), immediately invalidate the cache using Spring Boot’s @CacheEvict annotation to ensure users see the latest data.
Cache Eviction Policies (Related)
To avoid cache overload, these eviction strategies are used:
| Policy | Meaning |
| LRU (Least Recently Used) | Removes the least recently used data first. |
| LFU (Least Frequently Used) | Removes the least accessed data. |
| FIFO (First In, First Out) | Removes the oldest added data first. |
| TTL (Time To Live) | Removes data after a specific time period expires. |
Here is a simple implementation example of cache eviction in Spring Boot. If you grab the concept, you can use it anywhere.
@Beanpublic RedisCacheManager cacheManager(RedisConnectionFactory connectionFactory) {Map cacheConfigurations = new HashMap<>();cacheConfigurations.put("users", RedisCacheConfiguration.defaultCacheConfig().entryTtl(Duration.ofHours(1)));cacheConfigurations.put("jobs", RedisCacheConfiguration.defaultCacheConfig().entryTtl(Duration.ofMinutes(15)));cacheConfigurations.put("searches", RedisCacheConfiguration.defaultCacheConfig().entryTtl(Duration.ofMinutes(5)));return RedisCacheManager.builder(connectionFactory).withInitialCacheConfigurations(cacheConfigurations).build();}
package com.jobplatform.service;import com.jobplatform.model.Job;import com.jobplatform.repository.JobRepository;import org.springframework.beans.factory.annotation.Autowired;import org.springframework.cache.annotation.CacheEvict;import org.springframework.cache.annotation.CachePut;import org.springframework.cache.annotation.Cacheable;import org.springframework.stereotype.Service;@Servicepublic class JobService {@Autowiredprivate JobRepository jobRepository;@Cacheable(value = "jobs", key = "#jobId", unless = "#result.status == 'FILLED'")public Job getJobById(Long jobId) {return jobRepository.findById(jobId).orElse(null);}@CachePut(value = "jobs", key = "#job.id")public Job createJob(Job job) {return jobRepository.save(job);}@CacheEvict(value = "jobs", key = "#jobId")public void updateJob(Long jobId, Job updatedJob) {jobRepository.save(updatedJob);}@CacheEvict(value = "jobs", key = "#jobId")public void deleteJob(Long jobId) {jobRepository.deleteById(jobId);}}
Yet you are clear on how Redis should be used and its implementation examples. Now you are ready to implement it on your project.
If you want to uncover its depth insights, continue to read………………..
Additional Considerations:
- Error Handling: If Redis is down, Spring’s caching abstraction falls back to the database. Log such events for monitoring.
- Cache Penetration: Avoid caching non-existent data by checking results before caching.
- Memory Management: Monitor Redis memory usage with the MEMORY USAGE command to prevent evictions.
- Scalability: For high traffic, consider Redis Cluster for distributed caching.
Caching Types / Strategies
There are several caching types (strategies) based on how and when data is stored and evicted. Understanding these helps design more efficient and consistent systems.
- Cache-Asied (Lazy Loading): Application checks the cache first; if data is not found, it is fetched from the database and then stored in the cache for future requests.
- Read- Through: The cache sits between the application and database and automatically fetches data from the database on a cache miss, keeping application logic simple.
- Write-Through: Data is written to both cache and database at the same time, ensuring strong consistency but slightly slower write performance.
- Write Back(Write-Behind): Data is written to the cache first and synchronized with the database later asynchronously, providing high speed but carrying a risk of data loss.
- Write-Around: Data is written directly to the database without updating the cache immediately, reducing unnecessary cache updates but possibly causing a cache miss on the next read.
- Refresh-Ahead: Cached data is automatically refreshed before expiration to prevent cache misses and improve performance for frequently accessed data, but it requires background processing.
Pros & Cons of Redis:
Pros:
- Response times drop( users in Pokhara and New Delhi notice instantly)
- Your database breathes, you can handle 5X-10X traffic without upgrading
- Spring Boot makes it stupidly easy.
The 6 Caching Strategies Every Dev Should Know
I still teach these to senior engineers because most people only know “Cache-Aside”.
- Cache-Aside (Lazy Loading) ← What we use in the code above, App checks Redis → miss? → fetch from DB → put in Redis.
- Read-Through: The cache itself talks to the DB. Cleaner code, slightly slower first hit.
- Write-Through Write to Redis AND the database together. Perfect consistency, slightly slower writes.
- Write-Back (Write-Behind) Write to Redis only, sync to DB later. Fastest, but risky if Redis crashes (rare but possible during load-shedding in Nepal).
- Write-Around Write only to DB. Good for jobs that no one will see immediately.
- Refresh-Ahead: Automatically refresh data 2 minutes before it expires. Great for trending job categories.
The Honest Pros & Cons (No Marketing Fluff)
Pros
- Response times drop dramatically (users in Pokhara and Patna notice instantly)
- Your database breathes — you can handle 5x–10x traffic without upgrading
- Spring Boot makes it stupidly easy
Cons
- Extra complexity (yes, even with annotations)
- Risk of stale data if you forget @CacheEvict
- Memory cost (though tiny for the early stage)
Should You Add Redis Right Now?
Honest recommendations is you should skip it for now if you have <5,000 daily active users. Focus on proper database indexes, query optimization, and the N+1 problem first. A well-tuned PostgreSQL on Render or Railway can easily handle 8,000-10,000 users comfortably.
But the moment you cross 8K-10K daily active users, especially if you’re getting traction in multiple cities, add Redis immediately.
Why? Because retrofitting caching after you’re live and growing is painful and risky. Doing it early is cheap and peaceful.
Real Cost Breakdown (In Nepali/Indian Rupees)
| Option | Monthly Cost | Best For |
| Self-hosted in Docker | NRS 0 | Tech-savvy teams |
| Upstash Free Tier | NRS 0 (up to 10K req/day) | Most startups |
| Redis Cloud 30MB | NRS 0 | Very early stage |
| Render/Heroku Redis | NRS 400–800 | Simple hobby projects |
| AWS ElastiCache | NRS 1,200+ | When you’re serious |
For 90% of you reading this, Upstash’s free tier is literally free and serverless — perfect for Nepal/India, where we love zero-maintenance solutions.
What Happens When You Forget Cache Invalidation?
I’ve seen it destroy user trust.
- Candidate updates phone number → recruiter still sees old number → missed interview
- Job marked “Filled” → still shows as open → angry applicants
- Profile picture updated → old photo everywhere
Short TTLs (15 min for jobs) save you, but proper @CacheEvict is your real safety net.
If you want to dive more into Redis-related concepts, like Redis Lettuce and Redis Stream. You can go through the attached link and clarify your concepts.
To conclude, for most job platforms in our region at present, a fast database and good indexing are sufficient. Drop your thoughts in the comments, especially if you’re building in Nepal or India. I read every single one.
